The Desperate Housewife’s Quilt Week 50 – Hair


This week will be chock a block with guests to make up the missing spots over the last 50 weeks.
My first guest for this week is the lovely Tracey Rampling from The Peony Teacup. Tracey has created two blocks for me. Firstly, this gorgeous heart themed block – The Thrifty Housewife and secondly – Peach Blossom Perfection, made from 1″ hexagons.
My second guest this week is the bubbly Kate Haydon Cruchley from Kate Quilts. Kate has designed this scrumptious block – Killers don’t wear aprons. Hmm
My third guest is Shirley Petersen who enjoyed making her first block so much she is back for a second. Shirley does not have a blog but her post can be found here – 4 patch fancy.
My fourth guest is Elaine Morgan from Hand Made -n’s. Elaine has made this cute little foundation pieced bug block – Button Bug
My fifth guest is Anna Veach from Urban Stitches. Anna has revamped the classic churn dash – Wonky Churn Dash
My Sixth and final guest for this week is Cassie Joughin from Cass the Coolest blog. Cassie has made this cool dimensional rose block – Tumbled Rose

- Freezer Paper or Template Plastic
- Extra fine Permanent Marking Pen / Pencil
- Large Fabric Scraps
Assembly
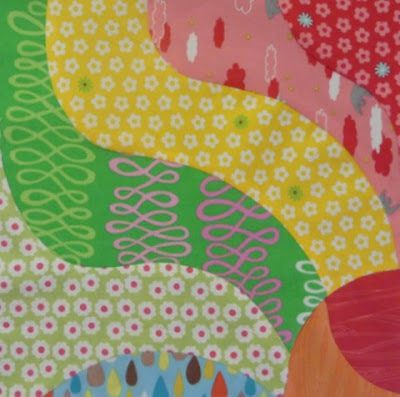
There are many methods to make templates and sew curves. Today I will show you one method which involves, freezer paper. If you don’t like sewing curves by machine, this block would be very easy to hand sew.
- Download the templates from here. Remember not to ‘Fit to Page’ or Scale when printing. (Templates are already mirrored)
- Trace the template pieces on to the dull side of freezer paper. Cut out adding 1/4″ seam allowance all the way around.
- Using a warm iron, press the pieces onto the wrong size of fabric, trace around the template to mark the fabric and cut out piece.

- Remove freezer paper and clip sparingly the inside curves. (This relaxes the seam so it it easier to manipulate the seam when sewing the curved pieces together).
- Sew pieces, C,D,E,F,G, and H together.
- Sew pieces A and B together.
- Join the 2 sections.
The truth be told, I don’t pin and I use my 1/4″ foot for most curved blocks. I use my left hand to hold the top fabric and lift slightly and the right hand to manipulate the bottom fabric. I find that only doing a few stitches at a time and then readjusting works for me. I use a stiletto to anchor the pieces at the end where it can get a bit tricky.
Don’t be afraid of the curve! If you think about it, a curve is a bent straight line. If you can sew a straight line, you can easily sew a curve. Just slow down and sew a few stitches at a time.
If I am doing a whole quilt in curve piecing I will use the Curve Master foot.
 |
| The Block – 8″ finished |
 |
| On point layout |
 |
| On Point Layout |
 |
| Horizontal Layout |
 |
| Horizontal Layout |
 |
| Horizontal Layout |


You May Also Like
Pandas and the Lone Ninja Birthday Block

Quickie Caffeine Carpets
