
Lollipop Quilt – Tutorial 2
Lollipop Quilt (continued) – See tutorial 1 for previous instructions
Step 9 – Sew the same solid colour pairs together.
Step 10 – Place the stem and lollipop on the solid block. I measured 3/4″ from top and 3/4″ from bottom of block. Iron the stick and lollipop onto the block. I machine appliqued the lollipop with a neutral thread.
 |
| There are many ways to applique – needle turn, fusible web – raw edge, machine applique or hand appliqued. It is really up to how you want the finished quilt to look – formal or naive. |
Step 11 – Select random pairs from the remaining charm squares to make 25 blocks.
 |
| I like to use a short stitch (2.5) and open my seams.If tension is good there should be no pulling apart of seams. Applying moderately dense quilting also helps to take the pressure off the seams. |
Step 12 – Lay out the blocks as per the picture below.

Step 13 -Sew the blocks together to form rows and then join the rows.
Step 14 – Layer the backing, wadding and top sheet and quilt as desired. I used Perle 8 cottons and stitched around the lollipops.

Step 15 -Cut four, 2 1/4″ strips from width of fabric (WOF) to make binding. Sew binding to quilt.

Voila – You have completed the quilt! Now add a label, photograph it and give it to someone you love. I will be donating this quilt to my little ones Kindy.
Twin Size instructions:
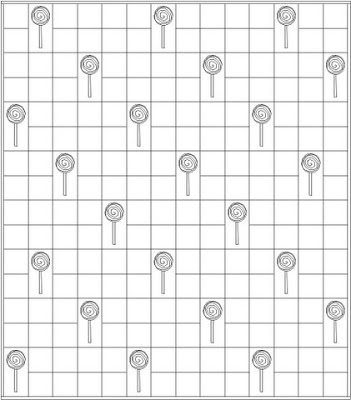
To make this quilt approx. 64″ x 73″ follow the layout in the diagram below.

You will need 178 patterned 5″ squares and 46 solid 5″ squares, plus 23 – 5″ squares for Lollipop Applique and some pieces for the lollipop stems.
For the binding, cut 7 x 2 1/4″ strips WOF.


