Finishing a Pillow/Cushion with buttonhole closure
Katy over at Imagingermonkey has been posting a great series on ‘How to make cushions/pillows’ this month on her blog. To get in on the fun, I asked Katy if I could write a couple of posts on styles of enclosures.
There are many ways to enclose a pillow/cushion, including envelope style, zips and buttonholes. Most people like the quick and easy envelope style. This is OK if your pillow is not too large or over stuffed. This method tends to separate a little so you have to ensure you have plenty of overlap. Using a heavier fabric or quilting the back pieces gives more body to the pieces and slightly alleviates the separation.

Buttonholes, like zippers, can be intimidating but when you have the right tools and know the techniques they become a breeze and will probably be your preferred choice for finishing your pillows/cushions.
Step 1 – Cut your backing pieces.
- Measure the front of your cushion/pillow.
- Cut Piece 1 the height of the front and 1/3 width of the front + 3″
- Cut Piece 2 the height of the front and 2/3 width of the front + 3″
e.g My pillow block was 12″ square. I cut Piece 1 – 7″(4″+3″) x 12″ and Piece 2 – 11″(8″ + 3″) x 12″

Step 2 – Finishing the overlapping edges
- Turn over edge 1/2″ and press, then turn over another 2 1/2″ and press.
- Sew 1/8″ away from folded line on back of piece and 1/8″ from edge.

Step 3 – Preparing Buttonhole placement
- Using Piece 1, find the centre point between the edge and stitched line and the 2 ends.
- Place dots either side of this point of equal distance apart. Leave enough room so the buttons do not touch and they are not too close to the edge of the pillow.
- Measure the diameter of your button and add 1/8″ for wriggle room.
- Using this measurement, mark your buttonholes on Piece 1

Step 4 – Sewing a buttonhole
- These days most machines have fancy smancy, fully automatic buttonhole functions. I am lucky enough to have one of these. Even if it is a basic buttonhole function, ensure that the height and width of the finished buttonhole casing is enough for your chosen button to slide through.

- Carefully snip with sharp scissors or a seam ripper the fabric between the casing. Be careful not to cut into the stitches.

- Overlay Piece 1 and 2 and mark the exact position on Piece 2 where the buttons should be attached. Double check your measurements.
- Sew on your buttons to piece 2 and voila your cushion/pillow is ready to be finished.
Note: The backing piece may be over sized. Trim back if required. Remember to overlap and pin Pieces 1 and 2 before you trim back.

Katy chats about different finishes for pillows/cushions. I like finishing mine with binding. Today I sewed the front and back, right sides together and turned the cover out.
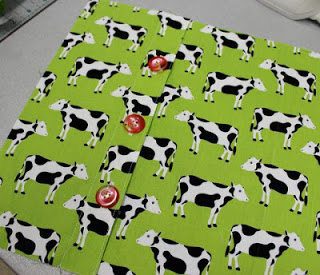
This is a little gift for my 7yo.

Finished size is 11 1/2″. I used a 14″ cushion insert ( only one I had available ) so it would be quite full. The advantage of the buttons, besides looking really cool and classy, is that they can hold the back together. With wear, the filling will shrink a little and the buttons won’t look so stretched.

I hope I have inspired you to give the buttonhole finish a try. I really enjoy it and it is an excuse to use my grandmothers beautiful buttons.


