
Stripping the Dresden
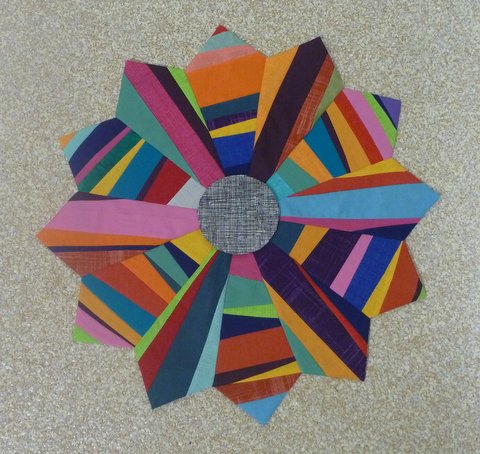
Here is a simple tutorial for making strip pieced Dresden plates – an alternative for using single fabrics for each blade.
Step 1 : Download the blade template here
Step 2 : Make 12 copies. Cut out paper foundations.
Step 3: Start adding strips from the top of the foundation. Cut the strips so they are not straight. Don’t make the strips too wide, vary sizes to introduce many colours into the blade.


Hint: Attach a wider strip at the top and bottom of the foundation template and avoid having seams where the point is made at the top.

Step 4: When the foundation is covered, trim and remove the paper.


Step 5 : Make the blades

- with the right sides together, fold the blade in half lengthwise
- Sew 1/4″ along the top of the folded blade.
- Snip the corner of the folded piece to allow an excellent crisp point
- Turn the blade right side out. Use a pointed object to push the point out.
- Centre the seam and press so the blade is even on both sides.

I have sewn the strips horizontally onto the blade. Try alternating each blade with vertically sewn strips.
Step 6: Arrange in threes. Sew them together to form halves. Sew halves together.
Step 7 – Make the centre by cutting a 4″ circle and raw edge appliquéing to the centre. Alternatively, add a 1/4″ seam allowance and needle turn circle to the centre.
Step 8 – Applique to background
Finished block 24″ x 24″


17 Comments
craftytammie
i love it! what a fab idea!
Katy Cameron
Ooh, that looks really cool, thanks for sharing the tute
Jess
Very, very cool.
Teresa Felgueiras
I love dresden plates. Yours is great, I'll have to try one of these myself.
Becky
That is just way cute! Thanks for sharing your tutorial with us. I think I will just have to try this.
WandaFish
Wonderful! I love it 🙂 Thanks for the tute.
CathyK
Great idea! Love it! Turned out fantastic!
Melody
Just brilliant. You are so inventive.
Tracey Rampling (The Peony Teacup)
Looks pretty straight forward, Jane – will start pulling fabrics!
PBPatch
You make it look so easy! I've never done foundation piecing before but I'm tempted to try it now.
Sunni @ Love Affair with my Brother
Mind….Blown….
Just a little question. Do you remove the paper before you do the seam across the top?
Live a Colorful Life
This is amazing!
Newbie Jen
Brilliant! and colorful! I love it.
Jacinta @ Kadesia Jane
Love it, great way to use up some small scraps. Love it!!!
Kisha
Can't wait to see what this looks like in a completed quilt. I love the scrappiness of it. Very pretty!
Good Earth Quilting
I'm doing some Dresden play over at my blog Good Earth Quilting and I've saved this link for inclusion in my post. Fabulous idea, so close to what I'm doing, its another cooool way to do Dresden fans heh?
Jane
That looks great! Now I have done a strong quilt and have much more fabric to use up!! A great way to use fabric and have fun.!