
Cushion for Christmas Blog Hop – Interchangeable cushion covers.
It’s my turn to present a tutorial on a cushion/pillow that could be made in one day as a gift for Christmas.

This cushion has tie on covers to suit the occasion. You just make one back piece and as many front pieces as you like to reflect the many celebrations throughout the year:
- Christmas
- Easter
- Birthdays
- Hanukkah
- Graduation
- Thanksgiving
- Spring/Summer/Autumn/Winter
- Valentines Day
The possibilities are endless. Easy to store in your linen cupboard and even used as a table topper.
Today I will show you how to make a cover for a 16″- 18″ cushion. If you want to make it for any other size, just add 2-3″ bigger for your cushion size.
I used Art Gallery Fabrics cool and crisp Minimalista collection, Pure Elements and Robert Kaufman Quilters Linen for this project.
Materials
- One 16″or 18″ pre made cushion/pillow
- Scraps for appliqué at least 5″ x WOF.
- 1 – 18 ½” x 18 ½” square for back
- 1 – 18 ½” x 18 ½” square for front
- 2 – 90″ binding strips 2 ½” wide
- 1 – 24″ x 46″ piece of wadding
- 1 yd backing fabric
- Matching thread
- Light weight Fusible
- 3 ½” yards woven ribbon or twill for ties
- 3″ circle template
- 60 degree triangle ruler
Assembly
Front cover
Applique
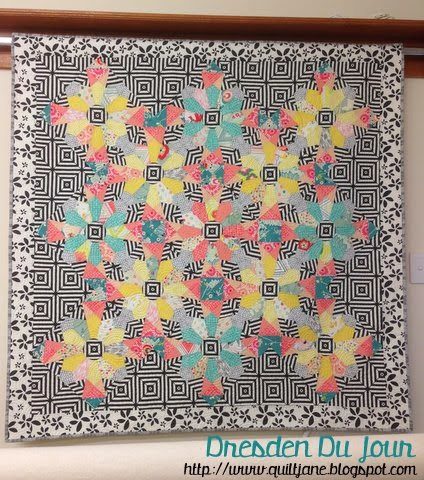
The appliqué is made up of 60 degree triangles and diamonds arranged in three rings of three sizes with a 3″ circle in the centre.
I have chosen fabrics from the one collection and arranged them one print per ring. You could make a scrappy version using different prints of the same value or a solid version, shifting from lights to dark.
The technique is the same for the 3 sizes of diamonds and triangles.
Cut from the light weight fusible:
- 1 – 1 ½” strip
- 2 – 3″ strips
- 2 – 4″ strips
- Press each strip to the back of the selected fabric.
- Trim back to 4″, 3″ and 1 ½” strips. Fold strips in half lengthwise.

- Using the 60 triangle ruler, cut on the fold at
- 2″ mark for 4″ strips,
- 1 ½” mark for 3″ strip and
- ¾” mark for 1 ½” strip
- Flip the ruler to cut triangles in-between each diamond ( no fold so 2 diamonds will be created for each cut)
- Cut 8 diamonds and 8 triangles. ( Triangles are not required for the outer ring )
- Trace a 3″ circle onto the dull side of the fusible and cut out leaving ⅛” seam allowance.
- Press to back of fabric and cut out on the pencil line.
- Fold the front cover fabric into 8 segments and lightly press.
- Find the centre of your circle, peel off the backing paper and press to background.
- Lay 8 small diamonds around the centre circle using the registration lines as a guide. Fuse in place.
- Lay 8 medium diamonds touching the points of the small diamonds, using the registrations lines as guides. Fuse in place.
- Lay the 8 large diamonds half way over the medium diamonds ( bottom tip of large diamond exactly in centre of medium diamond), using the registration lines as a guide. Fuse in place.


- Place the small and medium triangles in between their complementary diamond size. The tips of the triangles should line up with the mid points of the diamonds. Fuse in place.
- Appliqué diamonds and triangles to background using your favourite method. I used raw edge appliqué as I was going to quilt heavily over the top.
Quilting
- Lay backing, wadding and from and back covers and quilt as desired. I used dense geometric patterns. For the back cover I used Kind Tut variegated thread 40wt Nile and front cover Aurifil 2024 white 50wt thread.
- Trim back to 18″ x 18″
Ties
This technique applies for the back and front.


- Cut 16 – 9″ pieces of ribbon or twill. You may prefer to make your own ties as well.
- Measure 5″ in from all corners and pin the ribbon inwards.


- Pin the ribbon tails out of the way so when you are attaching the binding it does not get caught in the stitching line.
- Sew on binding from the front.


- Fold over binding to back and hand stitch down.

- Tie front cover to back and voila you have an interchangeable cushion cover.

I hope you have enjoyed today’s project for the Cushion for Christmas Blog Hop hosted by Melissa. Make sure you visit all the blog hop participants to discover some amazing and fun cushion/pillow projects.
Sunday 1st December – Melissa at Ms Midge Made by Me
Monday 2nd December – Gemma at Pretty Bobbins
Tuesday 3rd December – Kristy at Quiet Play
Wednesday 4th December – Joshua at Molli Sparkles
Thursday 5th December – Alyce at Blossom Heart Quilts
Friday 6th December – Fiona at Finding Fifth
Saturday 7th December – Abby at Things For Boys
Sunday 8th December – Lauren at Molly and Mama Makes
Monday 9th December – Jodi at Tickle and Hide
Tuesday 10th December – Adrianne at On The Windy Side
Wednesday 11th December – Rachel at Little White Dove
Thursday 12th December – Gina at Party of Eight
Friday 13th December – Jane at Quilt Jane
Saturday 14th December – Round up of Blog Hop and link up YOUR projects!


Cushion for Christmas Blog Hop
Christmas is fast approaching and many quilters and crafters out there will be looking for projects to make for gifts. Melissa is hosting her first Blog Hop this December – ‘Cushion for Christmas‘. Thirteen bloggers will present a tutorial for a cushion that can be made in a day. Simple and fun.
The Blog Hop kicks off Sunday 1st December AEST.
Sunday 1st December – Melissa at Ms Midge Made by Me
Monday 2nd December – Gemma at Pretty Bobbins
Tuesday 3rd December – Kristy at Quiet Play
Wednesday 4th December – Joshua at Molli Sparkles
Thursday 5th December – Alyce at Blossom Heart Quilts
Friday 6th December – Fiona at Finding Fifth
Saturday 7th December – Abby at Things For Boys
Take a breath……
Sunday 8th December – Lauren at Molly and Mama Makes
Monday 9th December – Jodi at Tickle and Hide
Tuesday 10th December – Adrianne at On The Windy Side
Wednesday 11th December – Rachel at Little White Dove
Thursday 12th December – Gina at Party of Eight
Friday 13th December – Jane at Quilt Jane
Saturday 14th December – Round up of Blog Hop and link up YOUR projects!


You May Also Like

Leaving on a Jet Plane
A few projects on the go.
