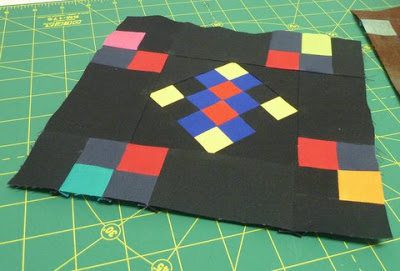
The Desperate Housewife’s Quilt – Block 8 Board Games
Welcome to week 8 of the ‘The Desperate Housewife’s Quilt’. Todays block is all about piecing and having fun with colours. Remember, this is not a quilt-a-long. Just follow the blog every week and pick and choose which blocks you would like to make. I will be injecting some uniqueness into traditional blocks, applique, three dimensional, crazy and thread-art blocks. If you make a block you can post it on the Flickr group for everyone to enjoy. Also, I have this nifty button under each post that allows you to save the post as a PDF.
I’ve been quilting since I was about 24 years old. Hand-piecing and hand-quilting are my favorite things to do. And though I don’t much care for assembly line piecing I do love knocking out a good quick pattern now and then. I have a blog and a podcast about quilting called the Pioneer Quilter. A lot of people think that my interest in hand work makes me hard-core traditionalist but it doesn’t really. I love the new waves of fabric coming along. I can’t believe how limited I was when I started, and by comparison, how much more limited quilters were just ten years before I started! Our quilting universe is expanding and I think that is terrific. I live in Northeast Ohio with The Husband and our two kids, The Boy and The Girl (that is how I refer to them in my podcast) and our two dogs, Duke and Krypto.
- Piecing
- Addition and Subtraction of fabrics.
From the black cut
- 4 – 2.5″ x 1.5″ rectangles
- 4 – 2.5″ x 3.75″ rectangles
- 2 – 3″ squares then cut once on the diagonal to yield 4 triangles
- 8 – 2″ x 1.5″ rectangles
- 4 x 2″ x 1.5″ rectangles
- 4 x 2″ x 1.5″ rectangles
Making the Centre Block
- Sew the strip sets together, press open seams
- Make 1.25″ segments from strip set
- Layout the strips as shown in the diagram below and sew them together remembering to match seams at each intersection
- Trim back the finished block to 4.75″ if required.
- Add your corner triangles. The tip of the triangle should be aligned with the centre. Cut of the ‘bunny ears’.
- Press seams to one side
- Add the other triangles at each end remembering to place the tip of the triangle aligned with the centre.
- Trim the finished block to 4.75″ square leaving 1/4″ at the tips of the 16-patch.
- Join the dark 2″ x 1.5″ pieces to the 4 red and 4 coloured pieces. Press open the seams. Trim back the finished block to 1.5″ x 2.5″ to make one half of the 4-patch. The un-finished 4 -patch will be 2.5″ x 2.5″ (I could have cut 1.5″ x 1.5″ squares to start with but when working with small pieces I personally find trimming back gives me a more accurate piece).
- Lay the pieces out as shown below and sew together the pieces as indicated by the arrows. Remember to match intersecting seams.
- Sew those finished pieces as indicated by the arrows in the diagram below.
- Sew the completed rows together as indicated below.
- This block may be a tad larger than 8.5″ unfinished so trim it back to 8.5″. (This is due to the small pieces in the middle being cut at 1.25″ not 1 3/16″ inches. I thought I would make it easier for you).


