Welcome to week 1 of the ‘The Desperate Housewife’s Quilt’. Todays block is all about 1″ finished squares. Remember, this is not a quilt-a-long. Just follow the blog every week and pick and choose which blocks you would like to make. I will be injecting some uniqueness into traditional blocks, applique, three dimensional, crazy and thread-art blocks. If you make a block you can post it on the Flickr group for everyone to enjoy. Also, I have this nifty button under each post that allows you to save the post as a PDF.
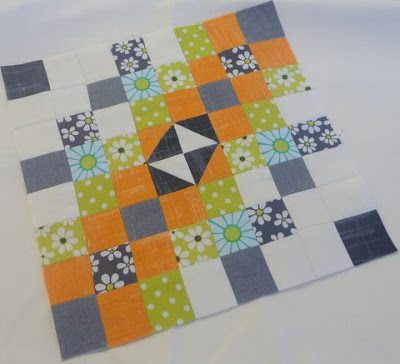
Eight Squared
Techniques explored
- Accuracy in cutting
- Accuracy in piecing
- Half Square Triangle
- Fussy Cutting
While this block could have a totally scrappy theme, I chose a definite colour pattern using limes, oranges, turquoise, greys/ charcoals, white and black. This block would look beautiful in any type of fabric as long as the contrast in the pathways are maintained and a balance of solids, tone on tones or small prints were included.
You will need the equivalent of :
- 4 x 1.5″ squares of turquoise fabric to be fussy cut ( approx. 1.5″ x 7″ strip )
- 12 x 1.5″ squares each of orange and lime fabric (approx. 1.5″ x 20″ strip)
- 14 x 1.5″ Grey Squares (approx. 1.5″ x 22″ strip)
- 2 x 1.5″ Black Squares (approx. 1.5″ x 4″ strip)
- 16 x 1.5″ squares of white fabric (approx. 1.5″ x 26″ strip)
- 4 x 2″ black squares (approx. 2″ x 10″ strip)
- 2 x 2″ orange squares ( approx. 2″ x 5″ strip)
- 2 x 2″ white squares (approx. 2″ x 5″ strip)
 |
| Prefect for fussy cutting |
 |
| Solids and small prints. Great for definition and contrast within a block. |
Use a scant 1/4″ seam ( one stitch line width less than 1/4″ ). It may not seem much but when you sew multiple pieces together they all add up. For example, your unfinished block should be 8.5″. If the seam was a tad larger than 1/4″ then you may end up with 8 1/4″ block.
Prepare your squares
From the prepared strips, cut the correct number of coloured squares and lay them in the correct order. (Hint, use spray starch on your strips to give body to your fabric. It will help stabilise the small blocks.
Fussy Cut the Four Turquoise Squares
Draw 4 x 1.5″ squares around the individual motifs. Make sure the motif is in the same position within every square. Cut them out and add them to the block layout.
Prepare the Half Square triangles for the centre rows
Lay a black and white 2″ square, right sides together. Draw a pencil line diagonally from one corner to the other on the wrong side of the white square.
Sew along this line.
Make 2 x orange and black and 1 more white and black.
Cut a 1/4″ seam allowance. Press seams open.
Using the 45 degree line on your squaring ruler as a guideline, trim back the HST’s to 1.5″s.
Now layout your squares in ready to make your block. (Hint – Keep a drawing of your block with colouring handy to make sure rows are correctly placed)
Join the squares to make a row
Chain piece the squares together row by row. Starting with pairs until all rows are complete. Press open your seams (
no steam and no stretching ).
When sewing such small squares always start with a scrap of fabric to lead on with and sew slowly to maintain accuracy in your seams. I use a stiletto but any sharp, pointy object would be fine, such as a wooden skewer, un-picker, long thin pin etc, to make sure I can manipulate and align the piecing when feeding under the foot.
You should now have eight rows
Joining the rows
The intersecting seams of the rows should fit snuggly together. Make sure you pin each seam so that the points will match when pressed open. Slow down when going over the intersecting seams. (
see pining seams post ).
Your finished Block
Give yourself a pat on the back. Kick off the stilettos or comfy slippers and pour a drink and stand back and admire your masterpiece.
Here are a few different ways you can use this block to make a quilt. Have a play with rotating the individual blocks to create new patterns. Try using the blocks on point for a whole new look.
To make more than one block you would use the ‘strip’ method of piecing ( See tutorial ).
*** Please remember that these blocks and any blocks designed by guest bloggers should not be used for commercial purposes ( sold as a pattern, published etc) without the written consent of the owner ***
Related


12 Comments
Modern Male Homemaker
I'm so excited, I can't wait to get started on this! With all those 1.5" squares I can make this whole block out of my scraps 🙂
Jolanda
Lovely block! I would love to partecipate, but don't know if I have enough time this summer. I'll save the blocks and see…
Linda
Thank you! This one looks like fun! I love the colors you used!
Laurrie
I LOVE this block! The options you have given at the end of the pattern are wonderful, and I can't wait to get home from work and make it. Looking forward to the subsequent blocks with bated breath.
Melody
Fabulous tutorial. I've not done much piecing, so I'm hoping sewing along will improve my skills. Should be fun.
elliek
Wow that is a lot of options. Love the block. Can I add it to my list of things to do? Not sure I have time but I would so like to…. see what the day brings or maybe the week.
Liz
A lovely block and great explanations.
Deanna
Thank you for sharing so many variations of setting. It is amazing how that changes things.
Diamant
That's absolutely gorgeous, Jane. What someone can do when they have the talent with colour/pattern mixing. I don't think any combinations in my stash would get that lovely effect but will give it a try when time permits.
Tonya
This is a great tutorial…all those great patterns. Thanks so much for this. I really like this block!!
Anne-Mette
Wauh, thanks for sharing this great tuturial with us. I really like the block.
LynCC
This is so pretty! I love how you've included pics of different layouts for multiples of the block. Would you care to share these in the linkup at BOMs AWAY (which I use for any interval project, not just monthlies)? Here's this week's link "party":
http://whatahootquilts.blogspot.com/2011/07/boms-away-monday-8.html