Back to school blog hop – Making multiple scrappy HSTs
Today is my day for the ‘Back to School Blog Hop – 2017’ hosted by the very talented Sam Hunter from Hunter Design Studio.
There are so many patterns that use the humble half square triangle (HST) and I am always thinking of ways to make multiple units at a time, especially scrappy HST’s.

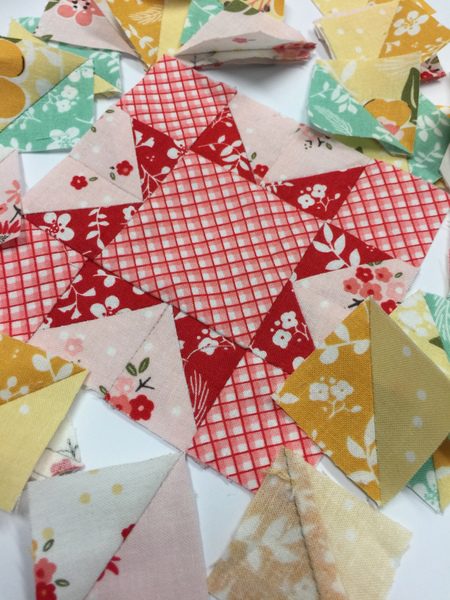
Using the beautiful 5″ Sweet Prairie charm squares sent to me by Sedef @downgrapevinelane. I created 32, 1 1/2″ square HST, 8 of each pair of prints. It’s easy and this is how you do it.
- Select 8 prints and draw 2 diagonal lines on the back of 4 of the 5″ squares.

2. Using a very scant 1/4″ seam, sew the 4 – marked prints together and the 4 – unmarked prints together. Press the seams in opposite directions.

3. Lay the two strips, right sides together, nesting the seams and pin in place.
4. Sew scant 1/4″ on either side of the marked line in one continuous motion.

5. To separate the units, cut close to the stitching line of the seam joining the charm squares.

6. Cut each unit into 8, HST’s.

7. Trim to 1 1/2″ x 1 1/2″ square. Make 32 in total.
Tip: Use another 5″ charm square to cut:
- 4 – 1 1/2″x 1 1/2″ squares
- 1 – 2 1/2″ x 2 1/2″ squares
and use
- 8, 1 1/2″ x 1 1/2″ HST’s
to make a finished 4″ x 4″ star.

Check out my previous post ‘Making 4 and 8 HST at a time’


Visit the other posts for great tips and tricks.
Day 1 – August 15 – Sam Hunter: How to spray baste a BIG quilt – www.huntersdesignstudio.com
Day 2 – August 16 – Mandy Leins: Thread Dread: removing stray bits after quilting – www.mandalei.com
Day 3 – August 17 – Nancy Stovall: The Sweet Creamy Filling – www.justquiltingpdx.com
Day 4 – August 18 – Ebony Love: 7 Indispensable feet for your sewing machine – www.LoveBugStudios.com
Day 5 – August 19 – Michelle Freedman: Machine throat plates – www.designcamppdx.blogspot.com
Day 6 – August 20 – Teresa Coates: Edge/Under/Top stitching – www.crinkledreams.com
Day 7 – August 21 – Kelly Cole: Ten ways to regain your sew-jo – www.vintagefabricstudio.com
Day 8 – August 22 – Megan Dougherty: Choose to Fuse: tips for working with fusibles for applique – www.thebitchystitcher.com
Day 9 – August 23 – Kim Lapacek: Tricks to being productive while hauling your kids around – www.persimondreams.blogspot.com
Day 10 – August 24 – Yvonne Fuchs: Circuitboard quilting on Domestic and Longarm Machines – www.quiltingjetgirl.com
Day 11 – August 25 – Sandi Hazlewood: Chain Piecing Quilt Blocks Tips – www.craftyplanner.com
Day 12 – August 26 – Juliet van der Heijden: Paper-piecing with children – www.thetartankiwi.com
Day 13 – August 27 – Maddie Kertay: Fabric folding for any storage solution – www.badassquilterssociety.com
Day 14 – August 28 – Cath Hall: Working with Lawn fabric – www.wombatquilts.com
Day 15 – August 29 – Tracy Mooney: Tips for the perfect seam – www.sewmuchcosplay.com
Day 16 – August 30 – Teri Lucas: How to bury thread – www.terificreations.com
Day 17 – August 31 – Debby Brown: Securing machine quilting knots – www. higheredhands.blogspot.com
Day 18 – September 1 – Flaun Cline: How to put some sparkle in your fabric pull (part 1) – www.ipleadquilty.com
Day 19 – September 2 – Jessica Darling: How to put some sparkle in your fabric pull (part 2) – www.jessicakdarling.com
Day 20 – September 3 – Trish Frankland: A bigger blade really IS better?! – www.persimondreams.blogspot.com
Day 21 – September 4 – Robin Koehler: Tips on how to travel with handwork – www.nestlingsbyrobin.blogspot.com
Day 22 – September 5 – Jane Davidson: How to make scrappy HSTs – www.quiltjane.com
Day 23 – September 6 – Linda Pearl: Low cost tips for organizing your sewing room – www.onequiltingcircle.com
Day 24 – September 7 – Christa Watson – Top 10 tips for quilting on a domestic machine – www.christaquilts.com
Day 25 – September 8 – Sarah Nunes: To Starch or Not to Starch – www.berrybarndesigns.com
Day 26 – September 9 – Suzy Webster: Testing fabric for bleeding – www.websterquilt.blogspot.com
Day 27 – September 10 – Sarah Goer: Machine bind your quilts like a pro – www.sarahgoerquilts.com
Day 28 – September 11 – Vanda Chittenden: Beginner paper-piecing tips – www.chittenden.co.za
Day 29 – September 12 – Cheryl Sleboda: Needle threading tips – www.muppin.com
Day 30 – September 13 – Kim Niedzwiecki – Different thread weights and when to use them – www.gogokim.com
Day 31 – September 14 – Sandra Healy: Conquer Your Fear of Machine Appliqué – www.sandrahealydesigns.com
Day 32 – September 15 – Sandra Starley: The Basics of Antique Quilt Collecting – www.utahquiltappraiser.blogspot.com


