The Desperate Housewife’s Quilt – Block 6 Phillip Screwdriver
Welcome to week 6 of the ‘The Desperate Housewife’s Quilt’. Todays block is all about curved piecing. Remember, this is not a quilt-a-long. Just follow the blog every week and pick and choose which blocks you would like to make. I will be injecting some uniqueness into traditional blocks, applique, three dimensional, crazy and thread-art blocks. If you make a block you can post it on the Flickr group for everyone to enjoy. Also, I have this nifty button under each post that allows you to save the post as a PDF.
*************************************************************
This week’s Guest Blogger
This week’s Guest Blogger
There is another gorgeous block from Karen waiting at The House of Wilson
*************************************************************
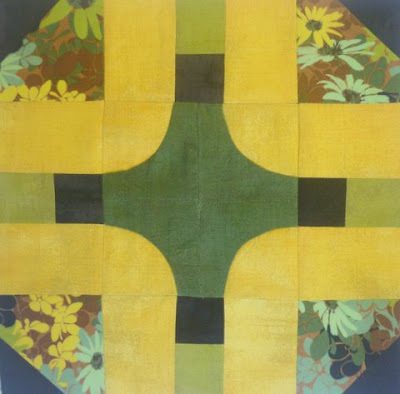
Phillip Screwdriver
A handy tool for any housewife to have to fix all those little things around the house.
Techniques explored
- Curved piecing ( It’s not so scary )
Material
I am a big fan of Basic Grey and I love the Origins collection. I thought it was perfect for this block. While I have kept to a quite simple colour placement, this block would look great with a totally scrappy look. I only used 5″ charm squares for this block.
Cutting
- Make plastic templates. Templates can be found here.
- Trace around the template and add a 1/4″ seam allowance when cutting.
- Cut 4 yellow ‘pies’ and 4 green ‘pie casings’
- For the rest of the block you will require:
- 8 – 2.5″ x 2″ yellow rectangles
- 4 – 2.5″ x 2.5″ floral squares for the corners
- 4 – 1.5″ x 1.5″ black squares for the corner triangles
- 1 – 1.5 x 6.5″ strip of black fabric
- 1 – 1.5 x 6.5″ strip of lime green fabric
Piecing the curved blocks
- Sewing curved is not difficult. It just takes patience and slowing down a bit. Just think of a curve as a bent straight line.
- Finger press the mid line of both pieces.
- Place the two pieces right side together with ‘pie casing’ on top and pin starting at the centre out. For such a small piece the ‘pie casing’ is on top so that the puckering is more manageable as the pieces are sewn.
- Just take a bite of the fabric as you pin making sure the pin is passing through the marked seam lines of both pieces. Start sewing slowly, watching for puckers and use a stiletto or sharp tipped object to work the puckers away from the sew line.
- The seam will comfortably press to one side – the yellow curve seam will be pressed towards the green.
- If you find these pieces too small to sew, traditional hand piecing will work well with this block. I used a 1/4″ foot to sew but if you have a ‘curve master’ foot or other specialised foot it will make sewing curves easier.
- Make 4 blocks each measuring 2.5″ unfinished.
Making the corner blocks
- Draw a pencil line diagonally on the wrong side a a black 1.5″ square. Place in lower corner of 2.5″ floral square, right sides facing together and sew along pencil line.
- Trim back to 1/4″
- Press team to one side.
Making the green / black strip pieced blocks
- Take the 2 1.5″ x 6.5″ black and green strips and sew together lengthwise
 |
| I used charm squares so I had to make 2 |
- Cut 4 x 1.5″ segments.
Putting the blocks together
- Sew the yellow 2″ x 2.5″ rectangles to the black and green 1.5″ x 2.5″ block. Press open seams. Make 4.
- Sew the four curved blocks together. Press open seams. The block should measure 4.5″ unfinished.
- Layout pieces as shown in diagram below and sew in rows. Remember to pin accurately and match all seams.
- Stand back and admire your curvy block. The unfinished size should be 8.5″.
Adding or subtracting colours from this block can make some interesting patterns. Maybe placing the block on point rather than horizontal for a change.
Maybe just simplify the block.
I hope this has inspired you to become a handyman or should I say, woman. Next week will be something from the pantry.
*** Please remember that these blocks and any blocks designed by guest bloggers should not be used for commercial purposes ( sold as a pattern, published etc) without the written consent of the owner ***


3 Comments
Katy Cameron
Oh how cool, thanks for sharing! I think it may be a little advanced for me right now, but I've saved it off for the future :o)
Dan R
I love this block.
Unknown
A beautiful design. I will have to try it, even with the "curve". I love the many different ways you used it and it looks so different.