
Guest Lissa Alexander – Nested Churn Dash and Tips/Hints 4

Lissa Alexander aka Modalissa was one of my first contacts in Moda. Lissa has always been welcoming, bubbly and bursting with creativity. Lissa was the genius behind the recent ‘Tone it Down QAL’ with APQ and made this divine quilt.

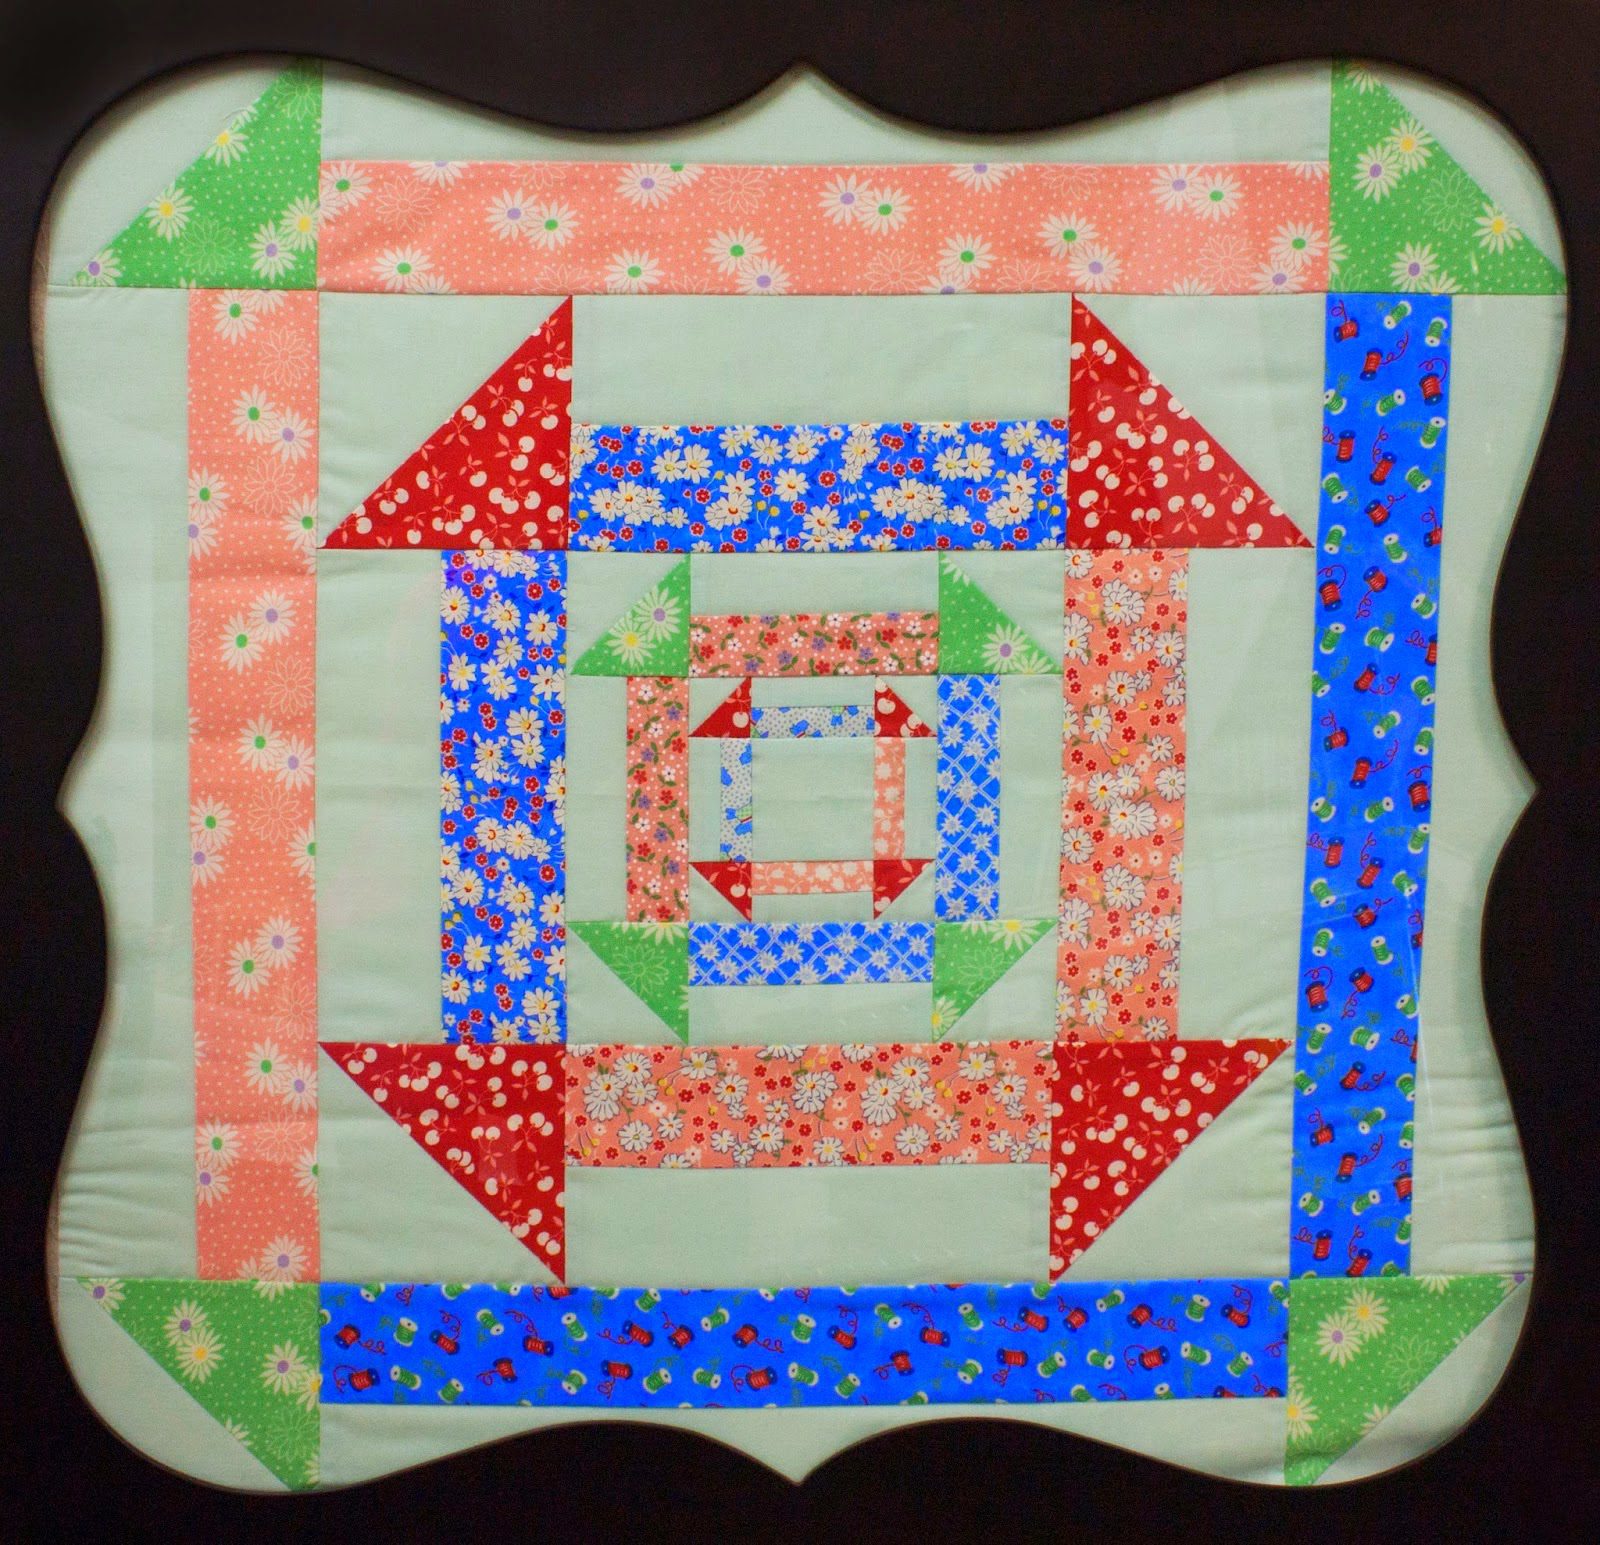
When I saw Lissa’s Artsy Fartsy (as affectionally described by Lissa) version of the Nested Churn Dash, I was truly inspired by its striking use of positive and negative layout within the blocks.
Lissa’s Nested Churn Dash quilt can be found here.
Tip/ Hint 4 – Chain Piecing
Chain piecing is a method that assists in speeding up the piecing process.
Be organised: Assemble in pairs, pieces that will be joined together across a row to make the whole block.
For example:
The ‘rails’ in the nested churn block could be paired according to their sizes and continuously sewn, pressed and set aside. Followed by the half square triangles.

Order: Order is important if each block has a specific colouring or layout of fabrics and piecing within a block. If you have a complicated block layout or colouring scheme it may be helpful to chain the pieces in one block at a time, assemble the block or place pieces on a design wall so you can keep track of the layout.
Thread :One of the advantages of chain piecing is that it saves thread. There is only a small amount of thread used between each pair of pieces.
Leaders: Using a scrap of fabric as a leader is not exclusive to chain piecing. Sometimes the fabric can get sucked into the plate. Using a leader to commence sewing stops this from happening and allows the stitches to start right at the beginning of your first paired pieces.
Tie On and Off: Many of the newer machines have the programmed tie on and tie off and automatic cutting feature. The older models don’t. However with chain piecing, the machine is running continuously from piece to piece.
If you set you stitch length a tad smaller, like 2.0 and make sure the tension is good then there is no reason to lock your stitches at the beginning and end of each piece as you sew. Leave a tail of thread 1/4″ long at the start and finished of the piecing so it won’t unravel.

With handling of seams, the applied pressure can part the stitches at the ends, especially around the edge of a quilt. If you need to lock the stitches while chaining there are 2 ways to do this:
1. Stitch, reverse and then continue stitching at both ends of pieces.
2. Decrease stitch size to smaller stitch (1.0, 1.5) . Sew a few stitches and then increase stitch size.
This slows down the chain piecing technique and I would recommend trying it without and being careful when handling the finished pieces.
Hint: Always check how much thread is on the bobbin before chain piecing. There is nothing worse than furiously sewing to find your bobbin ran out 10 pieces ago.
Tomorrow, the wonderful framed block from Kimberly at the Fat Quarter Shop http://www.fatquartershop.blogspot.com.au
Don’t forget to visit Carrie, Kim and Pat and view their gorgeous projects.
June 9th – Carrie Nelson – http://lavieenrosie.typepad.com/lavieenrosie/
June 10th – Kim Niedzwiecki – http://www.gogokim.blogspot.com.au
June 11th – Pat Sloan – http://www.blog.patsloan.com
June 12th – Lissa Alexander – http://www.modalissa.blogspot.com
Next week we will be delighted with projects from these talented people.
June 16th – Frances Newcombe – http://www.bellybuttonsboutique.blogspot.com
June 18th – Sherri McConnell – http://www.aquiltinglife.com
June 19th – Sara Lawson – http://www.sewsweetness.com
June 20th – Amy Smart – http://www.diaryofaquilter.com
June 21st – Katy Jones – http://www.imagingermonkey.blogspot.com
Upload your finished blocks or projects to the Flickr Group to win some beautiful Aurifil thread packs and other great prizes. Use #NestedChurnDash on IG, FB, Flickr and twitter. Winners will be announced 30th July 2014.
I have been blown away by the amazing blocks and projects turning up on Flickr, FB and IG. One that caught my eye was Leanne Elliott’s – DaisyandJack – bee block project.
I did an example illustration of how you could the 4″, 8″, 16″ and 24″ blocks in combination. They are all units divisible by 4.

Leanne ran with this concept for her do.good.stitches bee and let me share this picture she posted the other day of her progress. I love it.


7 Comments
mascanlon
So much creativity! I am dying to get started but have a few deadlines first. And the blog hop is just adding to the ideas. Thank you for all the fun! I have the pattern already too.
Melody
Wow, love Leannes quilt
margaret
some very useful tips here. I know only too well about the bobbin running out, it is about time machine manufacturers came up with a warning sound or flashing light to let people know.
lovetostitch
Funny, I've been working on a churn dash since beginning of the year thru a local shop (making a block from a fat 1/8 each month) , and was using this concept, I just didn't think to nest them. Love it, and may just have to nest a few. I'm really enjoying seeing all the different ones
A Quilter's Mission
Sew much fun. Thanks for the links & info!
One Wee Bird
Oho ooh that last quilt with the different block sizes just gave me the inspiration I needed for my NCD….thankyou for sharing!!!
leanne
wow Jane – thanks so much for the lovely words 🙂