
The Desperate Housewife’s Quilt – Block 9 All Washed Up

Welcome to week 9 of the ‘The Desperate Housewife’s Quilt’. Todays block is all about curved piecing. Remember, this is not a quilt-a-long. Just follow the blog every week and pick and choose which blocks you would like to make. I will be injecting some uniqueness into traditional blocks, applique, three dimensional, crazy and thread-art blocks. If you make a block you can post it on the Flickr group for everyone to enjoy. Also, I have this nifty button under each post that allows you to save the post as a PDF.

- Curved Piecing using the glue and topstitch method.
For the foundation piecing I have used Stitch N Wash. This is a product from Floriani that is very light weight with a slight adhesive to stabilise your appliqué and then wash away. You can use anything from interfacing to newspaper. Be careful to remove all paper and interfacing from block before washing. Interfacing can shrink and distort the block. You can leave the Stitch N Wash in the block.
For the background pieces I used freezer paper as an iron template. Again you can make a template from whatever you are comfortable with like plastic or cardboard.
 |
| Piece 1 |
 |
| Piece 2 |
Making the Foundation Curved Pieces
- Download the Foundation Templates – Foundation Templates here
- Trace the templates onto your foundation. DO NOT include the 1/4″ seam allowance when tracing. We will add this when we are cutting out the finished piece. The seams would be too bulky and hard to turn


- Place your first two pieces, right side together on back of foundation and pin. Sew on pencil line using a shorter stitch ( 1.5 )

- Press over seams with finger or wooden iron. Do not use heat at this stage.
- Trim back the seam to 1/4″

- Continue until all pieces are added. It will look quite messy.

- Trim back, leaving 1/4″ seam allowance around foundation template

- Repeat for second foundation template piece
- Download the background templates. Find Templates here
- Trace the templates onto the non shiny side of the freezer paper. Use a cool iron and press onto back of fabric.

There is no sewing of two curved pieces. On one piece, the seams are glued over the template and on the other it is tucked under the glued piece. The two pieces are then topstitched.
- Take the large curved piece and press the 1/4″ seam allowance over to the back on the top and bottom edges of the piece. Use a fabric glue stick and glue it down. The curve should be gentle enough so no clipping is necessary inside the curve.
- If you don’t have fabric glue, paint starch on seam and press until dry.
 |
| Back |
 |
| Front |
- Take the other curve piece and only press and glue the top edge.

- Lay out the pieces in the order they will connect together. Turn the pieces over and place some glue along the seam line of the background piece. Lay the foundation curve piece on top. Let glue dry.
 |
| Piece 1 – both pieces should lay over each other with 1/4″ seam allowance |
 |
| Piece 2 |
- Turn the pieces over and topstitch very close to the edge of the curve. Repeat for other piece.

- Join the two finished sections by overlaying, glueing and topstitching together. Before glueing and topstitching, lay a squaring ruler over the block to check that is is 8 1/2″ in size. if not you can adjust join by sliding the two pieces up or down.

 |
| The Block |
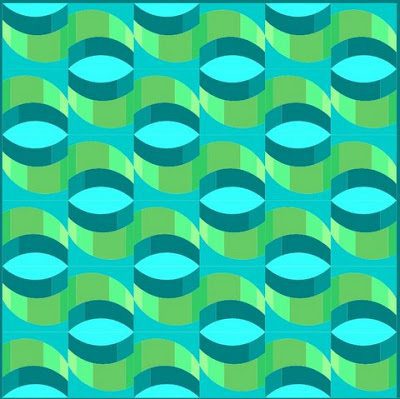 |
| Horizontal Layout with rotation |
 |
| Add a splash of colour |
 |
| Horizontal with more rotation to make pinwheels |
 |
| On Point ( Looks like hat boxes ) |
 |
| On Point with rotation |
 |
| On Point with rotation to form pinwheel design |
 |
| Add a bit more colour |
 |
| On point with rotation in pinwheel format |

You May Also Like

January Block Swap

Sew Seasonal Blog Hop – Mini Advent Calendar

4 Comments
robin
Nice! Love the pinwheel effect. 🙂
Cheryl Greenleaf
This is the coolest thing I've seen in a long while (quilt wise that is)!
Thank you so much for the very clear tutorial.
Did you draw the block in EQ?
If so, can you share the PJ7 block file with us?
Thank you!
Cheryl
Pauline
Wow- I love this block and the way you always show how it will look in a quilt with all the same block.
Thanks!
Dan R
Ooh. I love the colorful pinwheel. . And thanks for the great tutorial. It's good to be reminded how useful wash-out glue can be.