
Splat Block Tutorial
These are the cutting instructions for the 24″ block I designed for the MQG Riley Blake challenge. My version had a 2 ½” circle and ‘Splat’ appliquéd in the centre but you can place your own 6 ½” finished block in the centre or appliqué a design.

Pieces
Cut: (please refer to diagram for colour placement)
Piece A: 4 – 3″ x 11″
Piece B: 4 – 3″ x 3 ½”
Piece C: 4 – 3″ x 8 ½”
Piece D: 4 – 2″ x 7 ½”
Piece E: 36 – 1 ½” x 1 ½”
Piece F: 12 – 3″ x 3″
Piece G: 8 – 1 ½” x 7 ½” ( 4 light grey, 4 dark blue)
Piece H: 16 – 1 ½” x 1 ½” ( 8 Dark grey, 8 orange)
Piece I: 4 – 2 ½” x 3″
Piece J: 4 – 2 ” x 4″
Piece K: 4 – 2″ x 5 ½”
Piece L: 8 – 1 ½” x 2″
Piece M: 8 – 1 ½” x 5 ½”
Piece N: 1 – 7 ½” x 7 ½”
Assembly
Make 12
1. Draw a diagonal line across Piece E.
2. Place on corner of Piece F.
3. Sew on line. Repeat for 3 corners.
4. Trim excess fabric.
5. Press open.

Make 4
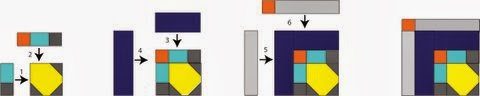
Make 4

Assemble as per diagram below.

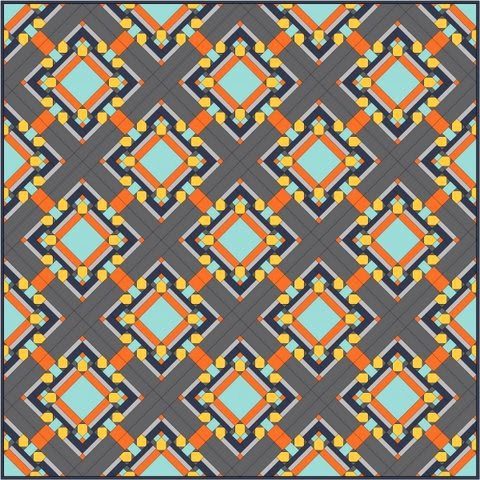
This is how a simple quilt would look made with the block.

Add your favourite block to the centre and it would look something like this.


I would love to see photos of blocks made using my patterns, so feel free to post on IG or FB and tag me using @quiltjane.


8 Comments
suemac
Love it. Trying to come up with ideas for my own stack.
sherry
Reminds me of a circuit board
A Quilter's Mission
WOW, how beautiful! Thanks for the tut.
Paula
Great block! I also see various fussy cut fabrics for the center of each block! Thanks for the tutorial.
Newbie Jen
fabulous block, thanks for the pattern
Laura
looks amazing Jane 🙂
Naomi
Thanks for the tutorial. This block has awesome potential. I am putting on my list to do!
frances newcombe
I LOVE THIS !!!!!!!!!!!