Threads, needles, bobbins and tension – Part 1
The ‘very important’ straight stitch in quilting
I thought I would share with you today a little of what I have learned about obtaining a perfect straight stitch.
There are four tools that are important to make a perfect straight stitch –
- the correct needle for the thread
- a good quality thread
- the correct tension for upper and lower threads
- and a single needle plate.
If you can get these tools balanced in combination with regular maintenance of your machine then your sewing space will be a happy place.
Needle
Choosing the correct needle for the thread is important. The size and type of needle determines how the thread will be handled. There are many on-line articles on choosing the correct needle for the type of thread. One in particular is the article from Schmetz. It has wonderful diagrams and charts explaining the sewing machine needle and the different types required for different fabrics.
http://www.schmetzneedles.com/Schmetz_Sales_Guide.pdf
If you have every wondered what the numbers mean on the needle box, then Bob from Superior Threads explains it well, “Needles range in size from very fine 60/8 to a heavy duty needle 120/16. Most needles use the two-number measuring system. The higher number relates to the metric system and defines the needle shaft diameter in hundredths of a millimeter. The lower number relates to the system in the U.S. and is an arbitrary number also used to indicate needle shaft diameter”
Juki published an interesting articles in how threads are wound http://www.juki.com.sg/Libary/Knowledge_of_The_Sewing_Thread.pdf
Threads
Threads come in many weights, fibre types and qualities. The threads I use most for piecing and quilting are 40wt, 50wt and 60wt threads in both cotton and polyester or cotton wrapped polyester. Polyester is fine to sew and quilt with as it is very durable, doesn’t leave fluff like cottons and contrary to popular belief, it does have a quite high melting point. If you place your iron on a setting just below cotton, it will not melt the thread. The melting point of Polyester thread is somewhere between 480 and 510 F (248-265 C). The new polyester threads on the market now will not compromise the integrity of a cotton quilt and damage the seams with wear. It is all a matter of personal choice what threads you use.
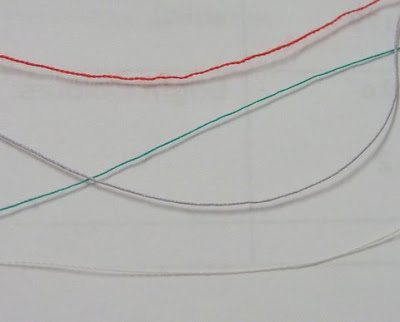
 |
| Red thread – Polyester Tex30, 40wt (#90/14) Grey Thread – Cotton 40wt (#90/14) Green Thread – Polyester 50wt (#80/12) Ivory Thread – Polyester 60wt (#80/12 or #70/10) |
The 40wt is the thickest of the three and is great for piecing and using in quilting where you want a very defined quilting stitch that highlights the quilting pattern. If I am using a 40wt on top, I will use 40wt or 50wt in bobbin. I chose a Topstitch #90/14 needle because it has a sharp point and produces even stitches when combined with a single hole needle plate.
 |
| Single hole stitch plates stop the fabric being dragged in. They help maintain an even straight stitch. Always check that you use the correct stitch plate for the selected stitch. The wrong plate can cause needle damage and subsequent damage to your machine. |
50wt is one of my favourites as it melts into the fabrics when piecing and disappears into the fabric when quilting. If you want the quilting pattern to show rather than the thread use the 50wt or 60wt. Use 50wt or 60wt in the bobbin. My needle of choice is the Topstitch #80/12 for both cotton and polyester threads.
60wt polyester is very fine and is used when you do not want the thread to show in piecing at all. Use 60wt in the bobbin. Recommended needles are Topstitch #80/12 or #70/10
Some people use the embroidery needle. This needle has a blunter tip than the topstitch, a wider groove and larger eye to handle delicate embroidery threads and ornate stitches. If you are experiencing problems with the embroidery needle, try the topstitch or quilting needle.
Needle Maintenance
Remember to change your needle frequently. A blunt or damaged needle can cause missed or untidy stitches or mimic tension problems. Just because it is new out of the package does not mean it is perfect. Some needles have manufacturing faults. Look for the telltale signs of a damaged needle.
- Broken or shredded threads
- Skipped or uneven stitches
- Puckered or damaged fabrics
- Popping sounds made by sewing machine
Make sure when you change the needle it is seated correctly into the machine. If it is not placed in correctly, your stitch quality will be compromised. Also, don’t screw the needle in too tight. Over tightening the screw that holds the needle in place can cause the screw threads to wear resulting in a loose fitting needle.
Be guided by the manufactures recommendation for needle size and replacement. I generally go to the manufacturers website and download the thread and needle guides. If in doubt, they are very helpful in answering any queries you may have about this topic.
In Part II, I will be discussing tension.


4 Comments
Linda
Thank you for a very informative post! This is the kind of information some of us have heard, but can't remember or have never heard at all.
ThankS!
Modern Male Homemaker
Thank you! Finally an easy to understand approach to needles and thread weights (and how us crazy Americans like to throw out arbitrary numbers just to mess with everyone!) Can't wait for the tension post!
Talin's Corner
Great info.. I will be looking forward to your tension post.
Samelia's Mum
Wow great post. Thanks for all of that information. Lot's of information I never knew. Looking forward to your tension post.